Threaded Quilting Studio

hand quilting

Quilting trick: removing threads under a quilt's surface

Jessie ZeiglerComment

It doesn't seem to matter how careful you are. Inevitably, dark threads seem to wind up trapped where you want them least, like just beneath the surface of the lightest fabric in a quilt top. I'm also going to assume that the quilt is already quilted, or at the very least basted at this stage. Sigh!

I ran into this problem often when I quilted for customers and I still run into it when I quilt my own tops.

But, after a helpful Instagram post pointed me in the direction of the Soft Touch Thread Pic by Clover, (see Amazon affiliate link) a few years ago, I've been able to capture those threads. This tool quickly became a within-arms-reach kind of a thing while quilting!

There's no sound in this video, but it shows the tool in action on one of the last quilts I was working on. The higher contrast in your fabrics, the more this issue will come up. It does take a little bit of finesse, but with practice, you'll get the hang of it. 

Did you know I have a list of tools and products that I use on the regular? Find it here: current recommends. I hope it's helpful, sometimes having the right tools at the right time makes all the difference!

Sew Mojo Series #2

Jessie ZeiglerComment
IMG_2121.jpg

I had the opportunity to test the latest pattern in the Sew Mojo series (#2) this last week. Thanks Suzy! If you haven't already, go check out the pattern listing that shows multiple variations and colorways of this pattern.

I have the wall space in my house already picked out to hang this series when complete, and I knew I wanted to use the same color palette for the second mini as I did the first. In fact, I used many of the same exact fabrics which should make for a very cohesive look in the end.

The emphasis is on composition in this second pattern exercise. Having next to no art training, I appreciated this mini lesson as it applies to quilting.

The pattern builds on the skills exercised in the first mini lesson and adds a healthy dose of intentionality without being oppressive in the slightest. In fact, I love how the pattern uses some guidelines but then encourages you to follow your creative impulses. (Which I was happy to do!)

Part of that creative impulse was to echo a design element of the first mini (above, left) in the second mini (above, right). Whereas the shorter wonky strips were going vertically along the side of the first mini, I wanted to play off of that idea and add wonky strips going across the top of the second mini.

Ultimately, I wanted the focus of the piece to remain with the orange center square, so in order to minimize the boldness of the strips along the top, I added matchstick quilting to those areas to unify that space and to downplay it.

IMG_2122.jpg

Once again, it brought me so much JOY to add some hand stitched lines to the mini quilt. Is embroido-quilting a thing? Because the thread is going through the top and batting (no backing necessary if displaying in a frame), it's "quilting". But since I'm also stitching with 3-ply embroidery floss and hunting and pecking my way around, it's kind of like embroidery, too. I'm good with the name-combo in any event. :)

In the areas where I added hand quilting, I marked my lines using a very faint white marking pencil by Sewline. I have an ever-growing list of tools that I use and personally vouch for, you'll find the details of the marking pencil included.

In keeping with the style of the first mini, I used machine quilted lines in the "background" areas and hand stitching in the foreground fabrics.

What can I say? Always perfectly imperfect!

sunshine + quilts = cat magnet

I hope that you'll give Sew Mojo #2 a try! It's an absolute blast to work out your creativity muscles, learn a new approach to design, and have a finished piece of art in the end!

Sew Mojo Series #1

Jessie Zeigler4 Comments
IMG_1832.jpg

I just finished up an awesome creative exercise and wanted to share some thoughts I took away from the experience.

Let me back up a sec. Last month I attended the Sew Pro convention in Chicago and met new quilting friends. [Come for the info, leave with friendships!] One of the topics of conversation that weekend was how my Sew Pro roomie Megan (find her on Instagram @citystitches) had lost her sewing mojo. She's got a great excuse, btw. She's busy planning her wedding, and because of that, hadn't sewn in months.

Listening with interest was Suzy Williams of Suzy Quilts. The question of recapturing that elusive sewing mojo conjured up an idea. A few weeks later, Suzy created this pattern series (with three more mini patterns to come) to help Megan and others bring back that sewing mojo! 

Find the pattern here in Suzy's shop. And definitely check out how this group of amazing quilters (and me!) took this pattern and freaking RAN WITH IT! 

To be candid: I have sewing mojo in spades. SPADES, I tell you! :) With ideas constantly in my brain and a full to-do list, I wasn't sure if I wanted to introduce a new project. I wanted to be up-front about that in case you too feel like you don't belong in the "lost my sewjo" camp.

In the end, my curiosity gave way to my schedule. Also? I loved the idea of challenging myself to do something out of the ordinary. And let's face it, the whole thing took less than a day. Anyone can give themselves a day to play!

I am so glad I did it!

Here's what I learned:

1) Quilting is art.

In my heart, I knew that. I think that because it's also my everyday, I can easily forget that fact. Putting textile art in a frame makes it more legit. That's just how it is. Putting it on the wall makes everyone else take notice, too. ("Mom, you DID that?!")

2) Sewing mojo doesn't have to be lost to be found.

Trying something new on a small scale was so fun and freeing. Even though I wasn't in a rut, I know that this simple exercise will affect how I approach future quilts.

3) I love quilting.

I will over-quilt every time I get the chance. It's who I am. In this case, I used my domestic sewing machine, my longarm and my own God-given hands to saturate this mini with quilting stitches. 

4) Adding hand quilting embellishments was my favorite part, "hands" down.

A+++++++ will do again. This was my first time! I "cheated" by hunting and stabbing each stitch, but that's okay with me, I love the look. This topic might be its own post at some point in time. :)

5) Editing is allowed in improv. 

My first design was this:

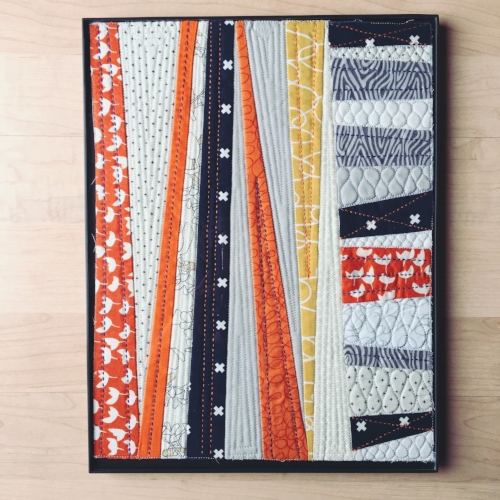
I had to chuckle when I took a photo of my work in progress and discovered my piece was almost exactly the size of a vinyl record. I selected my fabrics with our music room in mind as being the final destination for my mini quilt. While the size was fitting for the theme of the room, when I discovered that I already owned three 10" x 13" picture frames, I decided to edit my piece to fit the frame. Instead of starting over or chopping off entire sections, I ripped out a few seams, trimmed the strips down in width and seamed them together again. I am so much happier with the "skinny", framable version.

"Compressed" after editing, but just as punchy:

6) It doesn't have to be complicated to be really valuable.

In addition to this sentiment being my main take-away from Sew Pro, this idea is also true as it relates to this pattern. This month marks the 11th anniversary of taking my first quilting class! Yet this totally accessible-to-anyone pattern/exercise stretched me and taught me so much.

And I have new wall candy!

Before I let you go, I wanted to share how I hung my framed mini quilt. This is one of my favorite tips (thanks, Mom!):

Straight pins (this is a glass head pin) are amazing "nails" for hanging things on drywall. You'd be surprised at how strong they are! It does take a lot of constant pressure to push them into a wall (watch out for studs!) but once they are in, they can support most standard frames. 

I love hanging frames this way because it doesn't require any tools and they leave the tiniest of holes if you should change your mind (see photo below). It's a wall freckle, for goodness sake!

Be careful not to use so much "sudden" force that you bend the pin. And seriously, you have to press so hard and steady that it's difficult to place more than a of couple pins at one time. Your thumb will get sore!

I'm looking forward to seeing what Suzy has up her sleeve for the next minis!  And of course, putting more tiny holes in—and art on—my walls.