Threaded Quilting Studio

Sew Mojo Series #2

Jessie ZeiglerComment
IMG_2121.jpg

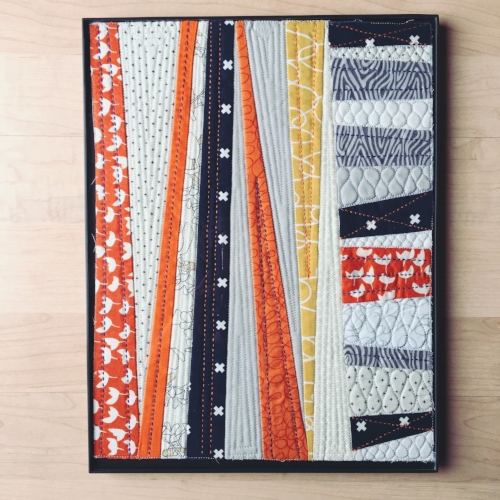
I had the opportunity to test the latest pattern in the Sew Mojo series (#2) this last week. Thanks Suzy! If you haven't already, go check out the pattern listing that shows multiple variations and colorways of this pattern.

I have the wall space in my house already picked out to hang this series when complete, and I knew I wanted to use the same color palette for the second mini as I did the first. In fact, I used many of the same exact fabrics which should make for a very cohesive look in the end.

The emphasis is on composition in this second pattern exercise. Having next to no art training, I appreciated this mini lesson as it applies to quilting.

The pattern builds on the skills exercised in the first mini lesson and adds a healthy dose of intentionality without being oppressive in the slightest. In fact, I love how the pattern uses some guidelines but then encourages you to follow your creative impulses. (Which I was happy to do!)

Part of that creative impulse was to echo a design element of the first mini (above, left) in the second mini (above, right). Whereas the shorter wonky strips were going vertically along the side of the first mini, I wanted to play off of that idea and add wonky strips going across the top of the second mini.

Ultimately, I wanted the focus of the piece to remain with the orange center square, so in order to minimize the boldness of the strips along the top, I added matchstick quilting to those areas to unify that space and to downplay it.

IMG_2122.jpg

Once again, it brought me so much JOY to add some hand stitched lines to the mini quilt. Is embroido-quilting a thing? Because the thread is going through the top and batting (no backing necessary if displaying in a frame), it's "quilting". But since I'm also stitching with 3-ply embroidery floss and hunting and pecking my way around, it's kind of like embroidery, too. I'm good with the name-combo in any event. :)

In the areas where I added hand quilting, I marked my lines using a very faint white marking pencil by Sewline. I have an ever-growing list of tools that I use and personally vouch for, you'll find the details of the marking pencil included.

In keeping with the style of the first mini, I used machine quilted lines in the "background" areas and hand stitching in the foreground fabrics.

What can I say? Always perfectly imperfect!

sunshine + quilts = cat magnet

I hope that you'll give Sew Mojo #2 a try! It's an absolute blast to work out your creativity muscles, learn a new approach to design, and have a finished piece of art in the end!

Fierce Feathered Star layout option

Jessie Zeigler1 Comment
This is my Fierce Feathered Star pattern shown in the 36 inch version (center) with another 36 inch star cut apart and added to the corners. Including the borders, this finished at 60" x 60".

This is my Fierce Feathered Star pattern shown in the 36 inch version (center) with another 36 inch star cut apart and added to the corners. Including the borders, this finished at 60" x 60".

When I decided to figure out how to expand the feathered star pattern that I love so much, I knew I wanted to go BIG!

When I created the free No Y Seam Feathered Star paper piecing pattern, I explored the idea of going small. The 8" block is a thing. Eight inches doesn't seem that small... unless you're talking about fitting 100+ seams in that space... Then it seems slightly cramped. :) Super-cute, don't get me wrong! But super-cute AND tiny. Don't worry, if you are interested in downloading the pattern, it also comes in a 12" and 16" version.

I loved the idea of creating one huge star as a stand-alone baby quilt. Baby quilts are my absolute favorite quilts to make! Have I mentioned that yet today? If not, baby quilts ARE the best. Exploring a new idea without a significant investment in materials and time is SO appealing to me. I mean obviously it's still more expensive and time consuming than buying a baby gift from a registry like a normal person. But, compared to what it takes to make a large bed quilt... it's a walk in the park!

This was my original vision for the 36". I was just going to quilt it and bind it. It would have been fine. But then I had another idea...

This was my original vision for the 36". I was just going to quilt it and bind it. It would have been fine. But then I had another idea...

Then I had this crazy thought that making only two of the huge blocks would cover significant "real estate"... but how would that layout work? A 36" x 72" masterpiece? Hardly! But what if I *shudder* cut up one of the blocks? If I set my main block on-point and then placed the cut-up star pieces in the corners? What would happen?

This is what happened. :( I didn't realize that what I needed were triangles and not squares. Clearly, my spatial reasoning skills leave something to be desired. I'm glad I used my brown scraps for this prototype, I didn't feel bad about cutting it up. Sorry, brown, it's not you, it's me.

Oddly enough, I got more confidence after I messed up the first block. I thought again and again about it and decided that cutting up a second block would work. 

I took this photo moments before I cut it up. I needed proof of its beauty in case it turned into a painful memory.

I took this photo moments before I cut it up. I needed proof of its beauty in case it turned into a painful memory.

I worked up the nerve and cut into my "good" block! I used a 24" ruler and aligned it exactly from the corner of the block to my first "reference point" which was intersecting the "capstone square" in its path. And then I aimed for my next patch (a triangle accent) to bisect. The cutting became easier after that initial slice was made. I kept going until it was in two pieces. I had to carefully reposition the block and my ruler several times to do a good job without stretching the bias edges I created. And then I cut diagonally in the other direction to get my four triangle corners.

One in-tact Fierce Feathered Star block set on-point.

One in-tact Fierce Feathered Star block set on-point.

One Fierce Feathered Star block cut diagonally into quarter square triangles.

One Fierce Feathered Star block cut diagonally into quarter square triangles.

Triangles placed in the corners around the main block.

Triangles placed in the corners around the main block.

The biggest question mark for me while I was piecing the top together: How bad are my points going to look?! Because I'd worked with on-point settings in the past, I knew that the setting triangles had to be longer than the main blocks in order to preserve the points. Since I was starting with two blocks the exact same size, I knew I was going to have blunted points when I seamed it back together, I just didn't know how much it would bother me.

If nothing about this photo bothers you, chances are you too can live with the drawbacks from this layout method. :)

If nothing about this photo bothers you, chances are you too can live with the drawbacks from this layout method. :)

In the end, I realized that it didn't bother me at all! The ease at which you can make two identically sized blocks and come up with this interesting lap quilt layout was much more appealing than a few triangle point "nubs". It's made even less noticeable when using the same or similarly-valued fabrics. 

The blunted tip is definitely minimized by using similarly-valued fabrics. Using the same fabrics would be even less noticeable.

The blunted tip is definitely minimized by using similarly-valued fabrics. Using the same fabrics would be even less noticeable.

I knew I would need some kind of border to stabilize all of the outer bias edges. Borders are something I don't generally add if I can help it. In this case, the borders were necessary and I added two: one to blend in with the main part of the quilt top and one to frame the whole thing. I was surprised by how much I liked the bold pink (almost red) color along the perimeter. I decided to use the same fabric for the binding. 

The arrows are pointing to the other "casualties" of this method and losing some of the points in the seam allowance. More importantly, the actual star tips are still nice an pointy!

The arrows are pointing to the other "casualties" of this method and losing some of the points in the seam allowance. More importantly, the actual star tips are still nice an pointy!

Overall, I'm so happy with this experiment! I'm glad I took the risk of cutting up a pretty block. The reward was pretty sweet. One last thing: How adorable is that gingham for the back??? Soooooo adorable. I would have also accepted "very adorable" as an answer. ;)

If you are thinking about making this quilt or using the Fierce Feathered Star block in your own quiltmaking, you can download the pattern here. You'll get detailed (and illustration-heavy) instructions for making either the 20" or 36" block, in addition to a whole video series demonstrating every step! There's no paper piecing and no y-seaming! :) 

Sew Mojo Series #1

Jessie Zeigler4 Comments
IMG_1832.jpg

I just finished up an awesome creative exercise and wanted to share some thoughts I took away from the experience.

Let me back up a sec. Last month I attended the Sew Pro convention in Chicago and met new quilting friends. [Come for the info, leave with friendships!] One of the topics of conversation that weekend was how my Sew Pro roomie Megan (find her on Instagram @citystitches) had lost her sewing mojo. She's got a great excuse, btw. She's busy planning her wedding, and because of that, hadn't sewn in months.

Listening with interest was Suzy Williams of Suzy Quilts. The question of recapturing that elusive sewing mojo conjured up an idea. A few weeks later, Suzy created this pattern series (with three more mini patterns to come) to help Megan and others bring back that sewing mojo! 

Find the pattern here in Suzy's shop. And definitely check out how this group of amazing quilters (and me!) took this pattern and freaking RAN WITH IT! 

To be candid: I have sewing mojo in spades. SPADES, I tell you! :) With ideas constantly in my brain and a full to-do list, I wasn't sure if I wanted to introduce a new project. I wanted to be up-front about that in case you too feel like you don't belong in the "lost my sewjo" camp.

In the end, my curiosity gave way to my schedule. Also? I loved the idea of challenging myself to do something out of the ordinary. And let's face it, the whole thing took less than a day. Anyone can give themselves a day to play!

I am so glad I did it!

Here's what I learned:

1) Quilting is art.

In my heart, I knew that. I think that because it's also my everyday, I can easily forget that fact. Putting textile art in a frame makes it more legit. That's just how it is. Putting it on the wall makes everyone else take notice, too. ("Mom, you DID that?!")

2) Sewing mojo doesn't have to be lost to be found.

Trying something new on a small scale was so fun and freeing. Even though I wasn't in a rut, I know that this simple exercise will affect how I approach future quilts.

3) I love quilting.

I will over-quilt every time I get the chance. It's who I am. In this case, I used my domestic sewing machine, my longarm and my own God-given hands to saturate this mini with quilting stitches. 

4) Adding hand quilting embellishments was my favorite part, "hands" down.

A+++++++ will do again. This was my first time! I "cheated" by hunting and stabbing each stitch, but that's okay with me, I love the look. This topic might be its own post at some point in time. :)

5) Editing is allowed in improv. 

My first design was this:

I had to chuckle when I took a photo of my work in progress and discovered my piece was almost exactly the size of a vinyl record. I selected my fabrics with our music room in mind as being the final destination for my mini quilt. While the size was fitting for the theme of the room, when I discovered that I already owned three 10" x 13" picture frames, I decided to edit my piece to fit the frame. Instead of starting over or chopping off entire sections, I ripped out a few seams, trimmed the strips down in width and seamed them together again. I am so much happier with the "skinny", framable version.

"Compressed" after editing, but just as punchy:

6) It doesn't have to be complicated to be really valuable.

In addition to this sentiment being my main take-away from Sew Pro, this idea is also true as it relates to this pattern. This month marks the 11th anniversary of taking my first quilting class! Yet this totally accessible-to-anyone pattern/exercise stretched me and taught me so much.

And I have new wall candy!

Before I let you go, I wanted to share how I hung my framed mini quilt. This is one of my favorite tips (thanks, Mom!):

Straight pins (this is a glass head pin) are amazing "nails" for hanging things on drywall. You'd be surprised at how strong they are! It does take a lot of constant pressure to push them into a wall (watch out for studs!) but once they are in, they can support most standard frames. 

I love hanging frames this way because it doesn't require any tools and they leave the tiniest of holes if you should change your mind (see photo below). It's a wall freckle, for goodness sake!

Be careful not to use so much "sudden" force that you bend the pin. And seriously, you have to press so hard and steady that it's difficult to place more than a of couple pins at one time. Your thumb will get sore!

I'm looking forward to seeing what Suzy has up her sleeve for the next minis!  And of course, putting more tiny holes in—and art on—my walls.

Attaching appliqué to a quilt top

Jessie Zeigler1 Comment

Thanks for joining me in Part Two of this applique tutorial! Part One covers preparing the appliqués by turning their edges with starch prior to attaching them to the quilt top.

In this tutorial, we'll take a look at the process I used for attaching the appliqué to the quilt top for this Purple Petals baby quilt.

I had 23 of these petal shapes to work with, so I began by playing! This design definitely evolved as I began working. I can't tell you how much it helps me to not only step back from my design wall as I'm working but to TAKE A PICTURE! Seeing a picture of your work will help you gain a new perspective. There is such a thing as getting too up close and personal with your work!

Playing with petal placement ideas

Playing with petal placement ideas

Trying a more organized approach to arrangement

Trying a more organized approach to arrangement

Trying different placement of appliqués on my design wall

Trying different placement of appliqués on my design wall

This was the first time it occurred to me that my petals looked a lot like orange peels!

This was the first time it occurred to me that my petals looked a lot like orange peels!

Design evolving...

Design evolving...

This is the placement I landed on (after a few picture texts to my sister asking for advice)!

This is the placement I landed on (after a few picture texts to my sister asking for advice)!

Once I decided on a design and placement of the applique, I pinned the appliques to the background fabric and moved it to my cutting table/workspace. I started by aligning the middle row of petals so that I could off-set or stagger the appliques in the row above and below it.

Appliqués pinned down in their designated space

Appliqués pinned down in their designated space

Petals are staggered or off-set from row to row

Petals are staggered or off-set from row to row

I used a Frixion pen from Pilot and a ruler to mark registration three straight lines horizontally across the width of the quilt. Ink from Frixion pens erase with heat or friction from the attached eraser but I would not use them on any parts of the quilt that would ever be visible. Since I knew these lines would be covered by appliqués, even if the marks would come back, they'd be covered. I needed to include that disclaimer! These pens can be a great tool if used appropriately, but since there have been accounts of the lines reappearing in cold temperatures, I would never risk using them to mark quilting lines, for example.

Registration lines made with a Frixion pen

Registration lines made with a Frixion pen

On the back side of the appliqué, I used an Elmer's purple washable glue stick and applied it around the seam allowance area. I didn't have to use any on the middle of the shape, although you could if you wanted or needed to.

On the bottom row of appliqué, I began by placing a petal that I wanted to be right between the petals in the row above. I also tried to get the end points of the petal shape to align with the drawn line. After the first petal was in place, I continued gluing and sticking the rest of the petals one by one across the entire drawn line. I pressed each petal down with my fingers so the glue made contact with the background fabric. I waited until all petals were glued and positioned before ironing.

Appliqué shapes positioned end-to-end with no space between

Appliqué shapes positioned end-to-end with no space between

After I had all of the petals glued and stuck into place, I and trimmed the petals that extended beyond the quilt top.

I carefully moved the quilt top to my ironing board and used a hot, dry iron to press each petal into place. 

Your milage my vary, but I wanted to share a photo of my sewing machine display so that you could see that I used a zig zag stitch and made it narrower and shorter than its default setting. You could use a different size of zig zag stitch, blanket stitch, satin stitch, invisible hem stitch, straight stitch... whatever you like! Experiment on a fabric scrap until you get the look that you like.

I positioned the quilt sideways so that the petals were aligned vertically and the 3rd (bottom) row of appliqué was under my needle. I stitched all of the way down the right edge of the appliqué petals. I did not travel all the way around each shape, but instead I continued along the right edge of the next petal shape as shown in the photo below.

When stitching applique into place using a zig zag stitch, I aim for the right position of the needle to land just beyond the appliqué shape into the background fabric as shown in the next photo.

As the stitch progresses and the needle transitions to its left-most point, the needle should come down on the appliqué shape as shown in the next photo. With this particular design, I was able to steer around the gentle curves without a whole lot of stopping, starting and repositioning. In other words, it was PDQ (pretty darn quick)!

Petals sticthed continuously along the right edge

Petals sticthed continuously along the right edge

Instead of stitching along the left edge next, I worked on the right edge of the 2nd (middle) row of petals. I did this because the rhythm of the zig zag stitch and its orientation to the needle and the appliqués is exactly the same. You would hate to kill the flow, too! :)

After the second row of petals was stitched, I moved on to the first row of petals, again, stitching along the right hand edge of the appliqués and working my way down the entire row.

If you can set your needle to be in the down-position when it stopped, it's very handy when doing this kind of work, especially if you do need to pivot or rotate.

Once all three rows of right edges were stitched down, I rotated the quilt 180° so that the unstitched edge of the appliqués was positioned on the right. I continued stitching in the same manner as before: petal after petal without stopping. 

First petal row is compete

First petal row is compete

Second petal row is stitched

Second petal row is stitched

All appliqués secured with stitching

All appliqués secured with stitching

After all the edges were stitched down, I folded the quilt in half. With the folded edge close to me and the selvedge edges from the bottom and top layer carefully aligned, I used a rotary cutter and 24" rotary ruler to trim a clean edge. I finished the top by trimming the other side and lastly the top/bottom edge.

At this point, I loaded the quilt top on my longarm frame and went to town on all of that yummy negative space! I recorded a video tutorial about how I do the overlapping spirals design shown, if you'd like to give it a go. The overall texture can be so amazing on solid fabric with that expansive "canvas"!

I hope that by giving you a peek inside my studio for the making of this quilt, it'll inspire you to try something out of your norm! It can be so refreshing and fun!

How I turned my appliqué edges using starch

Jessie Zeigler2 Comments
Close-up of pieced appliqués, tutorial for background quilting found here: overlapping spirals

Close-up of pieced appliqués, tutorial for background quilting found here: overlapping spirals

I recently made this baby quilt that prominently features appliqué. To a degree, this style of quilt is out of the norm for me, but when I finished I thought: Why don't I do this more often?! It was a lot of fun!

The tutorial that follows is the process I used to achieve this look, but there are so many ways to make and use appliqué! If this doesn't trip your trigger, you should find another way that does. There is something about the versatility of appliqué that can make you believe that any design and any idea is achievable in quilting. And I love that feeling of empowerment! Go forth and create something new!

Another note before we get started: I specifically wanted to use scraps and so I pieced all of the appliqué shapes in this quilt, but this technique would totally work (and be simpler) using a single, non-pieced chunk of fabric. :)

1) I sketched out a very fast "petal" outline on a piece of cardboard and cut it out. It was imperfect and organic-looking. Instead of trying again to make a more smooth, symmetrical shape, I just went with it. Next, I traced around my petal cardboard template multiple times directly onto the paper side of a section of freezer paper. I made as many petals as would fit on the section of Reynold's Freezer Paper I haphazardly cut from the roll.  BTW—I didn't notice this until later—the shape I drew looked very much like an orange peel, which would have had some fun applications!

2) To make my templates more durable, I doubled the thickness of the freezer paper. To do this, I ironed a new section of freezer paper—larger than in step 1—shiny side down directly to my ironing board until it adhered and was firmly in place. Then, I ironed the freezer paper that I'd traced upon in Step 1 directly on top of the base freezer paper, also shiny side down until it was completely adhered. {The marked freezer paper is stuck to the base freezer paper is stuck to my ironing board at this point.}

3) Next, I peeled the double-thick freezer paper from the ironing board and cut the leaf shapes out on the drawn lines.

The idea I had first envisioned was to make a variety of petal/leaf shapes. And then I didn't. Instead, I used the same shape over and over again and decided that I was going to vary the fabrics used in the petals. I stitched together a bunch of odd-shaped purple fabrics I had leftover from using Tri-Recs rulers in making this quilt:

Purple triangle quilt made with Tri-Recs rulers, free-motion quilting tutorial here: feathered spirals

Purple triangle quilt made with Tri-Recs rulers, free-motion quilting tutorial here: feathered spirals

Scraps used for the appliqué

Scraps used for the appliqué

4) I began by pairing and sewing my scrap pieces together. For this particular quilt, I wanted the pieces to look scrappy, which meant that my intention was to sew fabrics that had contrast next to each other. I continued to add to the "clusters" of fabric until the piece was large enough that the petal templates fit comfortably inside while also accounting for a seam allowance of at least 1/4" (although I was aiming for a seam allowance more like 3/8" but I didn't do any exact measuring).

Contrasting fabrics sewn next to each other

Contrasting fabrics sewn next to each other

Seams pressed open, template fitting inside the fabric piece

Seams pressed open, template fitting inside the fabric piece

5) Next, I pressed the petal templates shiny side down to the wrong side of the fabrics, as shown above. Once the templates were firmly adhered, I used a pair of scissors to trim around the outside of the templates. As I mentioned before, I left a 1/4" - 3/8" seam allowance.

Real-life "seasoned" pressing surface :)

Real-life "seasoned" pressing surface :)

6) I used a can Faultless spray starch and sprayed it into the lid to get a concentrated liquid amount. Then I applied the spray starch from the lid to the fabric by using a paintbrush. I started by wetting (not soaking) both ends of the petal shape.

Folding starched tip over template

Folding starched tip over template

7) After wetting the ends with starch, I folded the fabric at the tip back against the freezer paper template as shown above. Using my iron, I pressed the fabric into place until the fabric dried and stayed in place (see next photo).

Both ends pressed into place

Both ends pressed into place

Bottom curved edge with starch applied

Bottom curved edge with starch applied

8) Once the ends were pressed into place, I applied more starch along the bottom curved edge of the petal as shown in the above photo. Then, I folded the edge fabric against the template and pressed it into place. My curves were gentle enough that I did not need to clip any seam allowances, but if you have sharper curves or angles, you may need to clip or notch the seam allowances to get the fabric to fold smoothly over your template.

Lower edge of the petal pressed toward the template

Lower edge of the petal pressed toward the template

9) Then, I repeated applying starch and pressing the remaining seam allowance over the last edge.

Each edge starched and pressed into place

Each edge starched and pressed into place

10) At this point, I peeled the template away from the fabric.

Template removed

Template removed

11) After the template was removed, I took a moment to re-press the edges neatly back into place.

"Finishing" press after the template is removed from back side

"Finishing" press after the template is removed from back side

Prepped appliqué from front

Prepped appliqué from front

12) I was able to reuse the freezer paper templates several times. Because I wanted to make the petals  "assembly line" style, I worked with a batch of 6 or 7 freezer paper templates at a time. They will last for many more applications, too.

Part Two of this tutorial can be found here.

When quilting really is therapy

Jessie Zeigler3 Comments

Today marks a new chapter of my life. This is the first time in my eleven years of momming that all of my kids are in school. I looked forward to this day so much when they were little and when we were trudging through the day in, day out of real and sometimes messy life. 

Like with everything else it seems, we came to this day unconventionally. The last one to leave the "nest" this time was my oldest son. I homeschooled him for the last two school years, this year (today) he returned to public school by his choice, and very excitedly I might add! Because he's on the autism spectrum, there are many ways in which he processes the world differently. A normal school environment can sometimes lead to big, unexpected problems. To say I've been anxious about this transition back to school is an understatement! I'm fine today, but last week I was a stress ball and found myself stress-quilting (okay, and maybe some stress-eating, too. Why can't it be stress-exercise?!?!) 

Which brings me to this project:

Range quilt patten by Modern Handcraft

Range quilt patten by Modern Handcraft

I will 100% of the time rather make a baby quilt than go shopping for any other gift! I pulled out my Range quilt pattern from Nicole Daksiewicz of Modern Handcraft because I just couldn't handle emotionally and mentally coming up with a new quilt design, which is what I often like to do. 

I just want to say for the record: This pattern is fantastic! It is fun. It is easy. It is expertly written. It is intended as a throw size (64" x 78") but I had no problems whatsoever adjusting it slightly to whip out this baby quilt (40" x 46", which is a PERFECT baby quilt size, in my opinion). I made ONE change in the direction of a wedge in the top right corner because I felt like it kept more true to the original design and sloping of the ranges. :)

So, even between emailing principals, having meetings, going to school Open Houses, taking my kid to appointments, I was still able to make this quilt in 24 hours! I'm talking from fabric selection using only the fabrics I already had to finishing the binding! It was refreshing and a little of my own therapy in the midst of a stressful week.

Another thing about this pattern as a baby quilt (but applicable for any size): It's so easy to customize the palette for either a boy or girl. I'm not into assigning pink to girls and blue to boys, but what I'm saying is that this is highly customizable for ANY palette or room decor.

For the quilting, I decided to use a variation of Angela Walter's Flower Power quilting motif (from her Free-Motion Quilting book) to make a texture-rich impact on the quilt top. As a solids (fabric) lover, but having my yardage tied up in another project, I think it would be so much fun to use all solids like Nicole has done. As a quilter, I absolutely love using solids because they show off quilting so well. And also as a quilter, I LOVE having wide open negative space to explore really fun quilting options. Next time...

I used a great black & white IKEA print on the back.

I used a great black & white IKEA print on the back.

One more brag I have about this pattern is that Nicole has a wonderful video you'll have access to when you buy the pattern that shows how really easy it is to cut the fabrics using the provided template. Easy, clever, slick... all the praises! :)

Let's have a great school year, shall we? Back-to-school time can be a great time to refresh and refocus goals. It might even mean more sewing and quilting time and I'm counting that as a huge plus for my next chapter!